Photographing the Milky Way
From Near New York City
Copyright 2016 by Michael Brochstein
|
|
Photographing the Milky Way Copyright 2016 by Michael Brochstein |
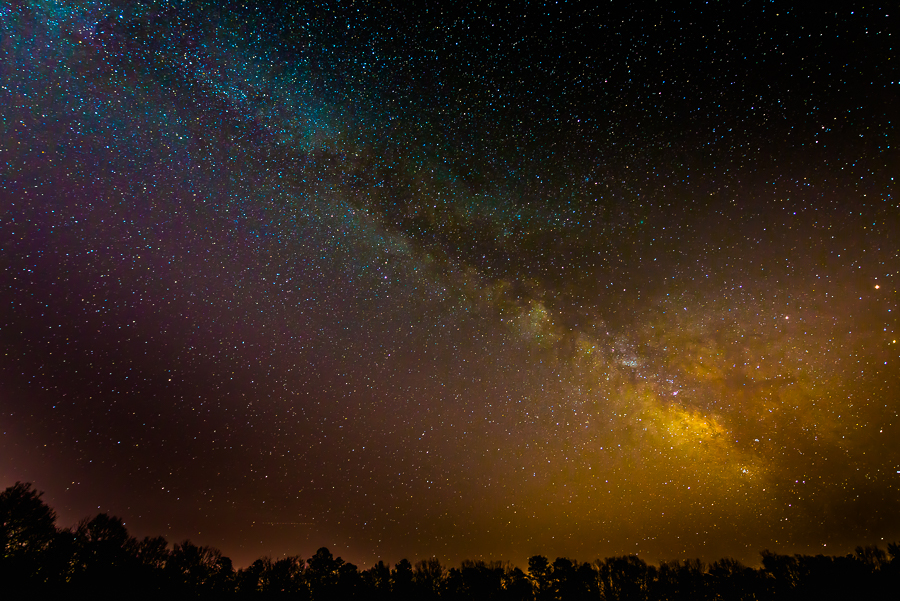 |
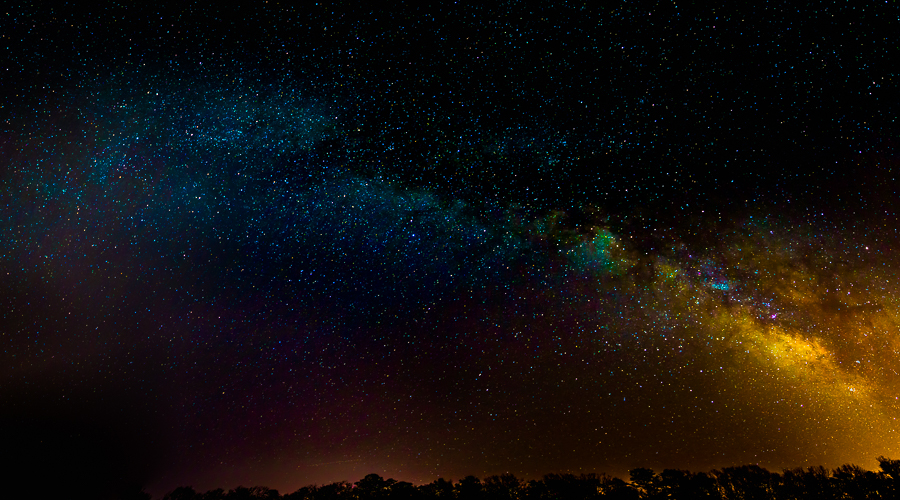
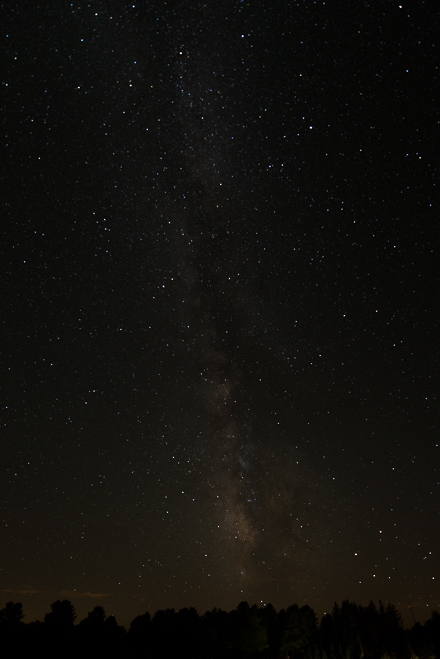
| The Milky Way as seen in early April 2016 from the Athletic Field at Belleplain State Forest (NJ). Technical Information: Nikon D800, Nikon 14-24/2.8 lens set at 14mm and f/2.8, 20 seconds, ISO 1600, post processing in Lightroom. |
|
Introduction Where and When to go to View the Night Sky Which way to look to see the Milky Way What Equipment Do You Need Essential Techniques for Photographing the Night Sky Michael's Equipment Recommendations Belleplain State Forest Cherry Springs State Park Online Resources |
| Introduction |
| The New York City area offers an amazing array of people, resources and opportunities of many kinds but these don't include a good way to do astrophotography due to the light pollution (see image below) that is prevalent in the area. Photographing the night sky demands a large very dark area and these don't exist in NYC's immediate vicinity. This purpose of this guide to help you successfully photograph the night sky from areas near New York City with an emphasis on photographing the Milky Way in particular. |
 Nighttime image of the United States, note how bright it is in the NYC area. (source: https://commons.wikimedia.org/wiki/File:Composite_map_of_the_world_2012.jpg) |
| Please note that any lens focal length descriptions below are full-frame size (and not equivalent sizes for crop frame sensor based cameras). |
| Where and When to go to View the Night Sky |
|
The best time of year to photograph the Milky Way is from mid-March
through mid-October. At other times of the year its location and that of
the sun only allow a view of the dimmer parts of the Milky Way as the
sun obscures the bright galactic center of the Milky Way. Observing Sites is a website which describes places in the US and Canada that have been recognized as good (and dark!) places to observe the night sky. I suggest starting your research with this website. When looking at its listing for sites in New York (5), New Jersey (3), Connecticut (1), Massachusetts (1), Delaware (1), Vermont (0), New Hampshire (1) and Pennsylvania (5) you will see a total of 17 sites listed. A number of the sites listed in these states are restricted in access in some way. This can include needing to be a member of particular astronomy club and/or access only during certain limited days and hours. If you restrict your search to sites which are not restricted in access, have superior viewing opportunities and that are no more than a five hour drive from NYC then only very few sites are meet this criteria. The ones that stand out are Belleplain State Forest (NJ, ~155 miles from NYC)) and Cherry Springs State Park (PA, ~267 miles from NYC). It is best to photograph the night sky when it is darkest. It is darkest when there is a new moon or in the nights very close to when there is a new moon. It is probably a waste of time to try and photograph the Milky Way and many other stars in the night if it is more than a few days away the new moon. The use of Stellarium and the Moon Phase Calendar are very helpful in predicting when would be a good time to do astrophotography. The Milky Way may only be visible above the horizon for only a short part of the evening so consulting these resources is highly recommended. A forecast specifically created for viewers of the night sky is available for popular night sky viewing areas, an example is below. The website ClearDarkSky gives detailed explanations for each row in the viewing forecast below. |
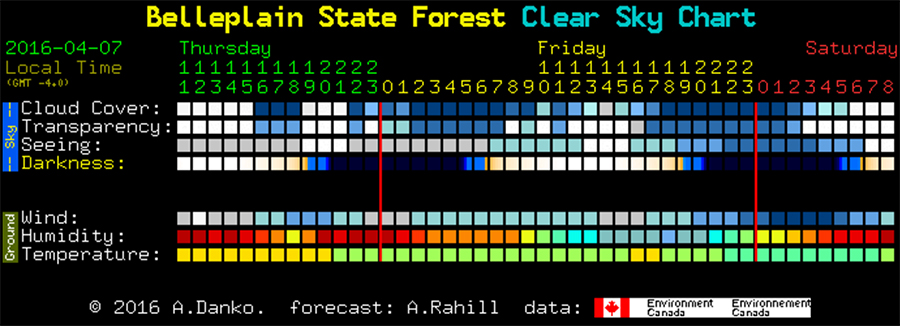 |
| Typical Clear Sky Chart showing details about expected night viewing conditions at Belleplain State Forest. (source: http://www.cleardarksky.com/c/BelleplainNJkey.html) |
| Which Way to Look to See the Milky Way |
|
The use of a handheld map / chart of stars and constellations called a planisphere
(click
here for an example) was the
common way used to know what one was viewing in the night sky. Commonly they have two round discs that rotate according to time of day
and time of year that when set correctly would show what the night sky
will look like. Today there is software available that goes well beyond what a handheld planisphere can do. There are various applications available for smartphones and computers / laptops. I highly recommend Stellarium which is a free application that I have found great for planning. I have found the the computer version (in Windows) much more useful than the smartphone version and therefore highly recommend that you try the computer version. |
| What Equipment Do You Need |
|
Camera - Superior low light sensitivity is an
advantage.
DxOMark is a website that rates the image sensors of
cameras in a multiple of ways including low light sensitivity. In
general, cameras with larger photosites (the space on an image sensor
for what is commonly called a pixel) are superior to cameras with image
sensors with smaller photosites. In general, newer image sensors and the cameras which have them have better low light sensitivity than older cameras. Cameras with larger image sensors (all else being equal) will generally have better low light sensitivity. In other words, full frame cameras generally have inherent advantages for astrophotography over crop-frame cameras. A small number of cameras have been designed specifically for astrophotography. One such camera is the Nikon D810A. If you want the best camera available for astrophotography then I recommend considering a camera like this. Lens - Choose a lens that is wide, fast (large maximum aperture), that performs well at wide apertures and is well corrected for distortions (i.e. coma). Since you will not be using autofocus (it will be too dark), manual focusing lenses are very useful for astrophotography as your subject will always be at the same distance, infinity. Generally lenses of 14 - 24mm in focal length with maximum apertures no smaller than f/2.8 are used for astrophotography. Tripod - Exposures will be a multiple of seconds long (exposures of 15 - 30 seconds are common) so a sturdy tripod is required. Also, the connection between the tripod and the camera should be as secure as possible to eliminate any movement during a long exposure. Arca Swiss style plates are, in the author's opinion, the most secure way to secure a camera to a tripod. A multiple of manufacturers make plates in this style. More information about them are here. It is recommended that the tripod used be rated for a much greater load than what you intend to use so as to ensure a steady base for your camera. Gaffer tape - Gaffer tape does not leave a residue when removed (painter's tape might be an alternative?). This will be used to lock lenses at infinity so that the focus does not accidently shift from when you set it to the appropriate place for focusing at infinity. Gaffer tape is commonly found in photography stores. Red colored headlamp - A red colored light will preserve your night vision and is also sometimes required in places which are used for astronomical viewing so that the use of a non-red light does not ruin the night vision of others who are also present (and would indeed mind if you did not use a red colored light). The author uses the Petzl TACTIKKA +RGB headlamp. Appropriate clothing - You will likely be outside in a field at night standing fairly still so clothing that is appropriate for the weather will keep you comfortable. Other recommended equipment: Ground cloth (which could be a large trash bag) to keep your equipment case dry, snacks, water, camp chair (might as well be comfortable), compass, bug net (if necessary). |
| Essential Techniques for Photographing the Night Sky |
|
The 500 rule - The earth rotates 360 degrees every 24
hours. If you left the shutter open for long enough then the stars will
become lines of light instead of points of light as your camera, which
is on earth, is moving. The 500 rule gives a guideline for how
long you can leave your shutter open before a star will become a line.
To use the 500 rule, divide 500 by the focal length of your lens. The result is the recommended maximum number of seconds you can leave the shutter open before a point of light becomes a line of light. For example, if you use a 20mm lens then the 500 rule says that the longest exposure you should use is 25 seconds (500 / 20mm = 25 seconds). Focusing at infinity when it is very dark - If your camera is able to focus automatically when you are doing night photography then it is probably too light in the area you are shooting to do astrophotography successfully. A common technique is to pre-focus during the day on an object that is at infinity (something very very far away) and then to use a small piece of gaffer tape (or an equivalent) to tape the focus ring on your lens in place where infinity is properly focused. It is important to note here that many lenses are not actually focused at infinity when the focusing ring is centered on the infinity mark (looks like a figure-eight) located on the distance scale of the focusing ring! The proper place for the focusing ring to be may in fact be slightly away from the center of the infinity-mark. Since all of the objects (stars etc) that you will be focusing on will be at distance of infinity as far as the lens is concerned, a manual focusing lens (one that can not autofocus) works well for astrophotography as you will not be adjusting focus in any way when you are actually doing astrophotography at night. If using an autofocusing lens be sure to disable autofocus (sometimes a switch on the lens which you set to manual). The use of "Live View" is sometimes used at night to adjust focus in case you suspect a focusing problem. |
 |
 |
|
| Two lenses (a 20mm and a 14-24mm) were pre-focused before dark on infinity (i.e. trees very very far away). The 20mm lens (left) was focused at infinity when the focus indicator was in the middle of the infinity mark (the sideways figure-8). The 14-24mm lens (right, at 14mm) was focused at infinity when the focus indicator was pointed at the middle of one end of the infinity mark. Blue painter's tape was used to secure the lenses at infinity. | ||
|
Self
timers, remote shutters - The act of pushing the shutter
release with your finger can create vibrations which can caused a
blurred image. Similarly, in a DSLR, the "slap" of the mirror when it
moves out of the way to actually take a photo can cause vibrations and
some image blur. It is for these reasons that various methods are used
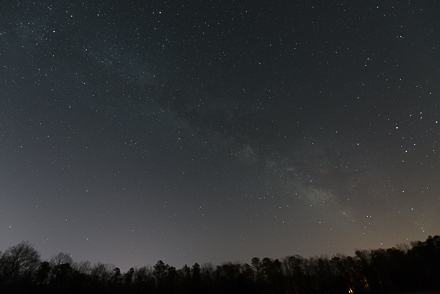
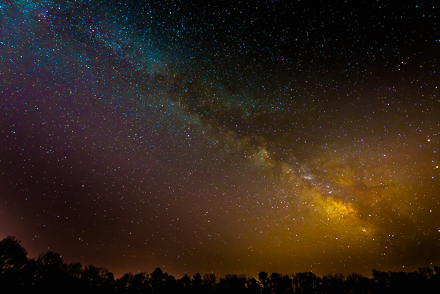
to avoid these problems. A classic method is to use a remote shutter release so that your finger does actually press the shutter release when taking a photo. Other people use the camera's built-in self timer for the same reason as the seconds between pressing the shutter release manually and when the camera actually takes a photo via the self timer is enough for any vibrations to dissipate. Personally, I prefer a different method. In many DSLR cameras there is a setting which, when the shutter is pressed, the mirror moves out of the way, then the camera waits a few seconds and only then opens the shutter to take the actual image. The author's cameras allow up to a three second shutter delay between when the mirror moves out of the way and when the actual photo is taken. This seems to be long enough for any vibrations to dissipate. One can improve on this by using the self timer in addition to the delayed shutter option. Avoid swinging camera straps - If it is windy then it is not only important to use a sturdy tripod that does not move at all in the wind along with a strong non-moving attachment mechanism between the tripod and the camera but also to make sure a freely hanging and swinging in the wind camera strap does not move the camera at all during a long exposure. If it is windy then tie down the strap or remove it. Tripods & Wind - If the wind is strong then lowering your tripod closer to the ground will increase its stability. In addition, weighing it down is another way to add stability. Post Processing - In other genre's of photography the advice to "get it right in the camera" may be used to suggest that one should obtain an image as close as possible to what you want your final output to be. Following this advice one should carefully frame and expose (and set white balance etc) when taking the photo so as to avoid spending more than minimal time in from of a computer post-processing (adjusting the image in Photoshop, Lightroom or other similar software applications). In astrophotography that advice is only partially relevant. While one should generally try to get it right in the camera, in astrophotography extensive post-processing is much much more the norm than not. Lots of articles about post processing are available online. I recommend the Dave Morrow Photography and Lonely Speck websites for their articles, videos and other material about post processing. An example of post processing for astrophotography is below. The image on the left is as it came out of the camera (in RAW with lens profile corrections applied in Lightroom). The image on the right is the final image after much more additional post processing in Lightroom. I did not add colors to the image on the right by painting the image with colored brushes. I changed the white balance, the tonal balance, increased the overall color saturation, contrast and brightness, decreased the noise, decreased (overall) the color yellow by a little, cropped it a little on the left and top and added some neutral density filters. |
 |
 |
|
| Before | After |
 |
| A composite (merge) of a multiple of images captured at Belleplain State Forest. (April 2016) |
| Another example (from Cherry Springs State Park) of a before and after image can be seen lower down on this page here. |
| Miscellaneous Advice - Shoot in the RAW format if your camera offers this option. If your camera, when shooting in the RAW format, has a choice of how many bits per pixel it records (i.e. 12 or 14 bits) then choose the higher number. Also, choose lossless compression or no compression if these are recording options (try to avoid "lossy" compression). |
| Michael's Equipment Recommendations |
|
Many manufacturers make equipment that is suitable for astrophotography.
The websites
Dave Morrow Photography and
Lonely
Speck both make general and specific recommendations. Below
are recommendations based upon the author's experience and research.
They are biased by the equipment that the author is familiar with and
therefore leaves out options that the author is less familiar
with. Camera: If you use Nikon DSLR's then in order of increasing low-light performance; Nikon D800, D810, D610, D750, D800E, D600, D4s, Df, D5 and D810A. What all of these cameras have in common is that they are all full-frame in format. If money is no object then the D810A would be the best option as it is specially modified for astrophotography. The author, and many others who pursue astrophotography, use the D800 (the "worst" option in the list above) and have gotten very worthwhile results. If you shoot with Sony cameras then consider (in order of increasing low-light performance) the A7S II, A7R II and A7S. Personally I'd go with the A7R II since it has 3+ times the number of pixels as the A7S . Lenses: Nikon makes 20/1.8 and 24/1.8 lenses that are well regarded and not in the Zeiss category price-wise. Also, their 14-24/2.8 is very well regarded and very popular among astrophotographers. Manual focusing prime lenses made by Rokinion, Samyang and Bower (actually the same company with identical products that use three different brand names) are all low cost manual focusing prime lens options that many astrophotographers use. Their 14/2.8 and 24/1.4 are both very popular among astrophotographers. One major caveat is that the quality of construction is not top notch and can be uneven. Stories of people having to try three or more copies of the same lens to find one that is properly constructed and adjusted at the factory are easily available online. Also, it has been noted online that these lenses are not as robustly made as more expensive lenses so they may not stand up to as much use, abuse or age as well. Despite all these caveats, it seems to be agreed by a multiple of trusted online sources that good copies of these lenses perform very very well for astrophotography and can therefore be great bargains cost-wise. Zeiss makes manual focusing primes that are considered to be excellent and that also cost considerably more than most other similar lenses from other manufacturers. Personally, I would recommend a lens at or near 14mm in length as a start. If you prefer one do-it-all lens then the Nikon 14-24/2.8 is highly recommended. |
| Belleplain State Forest |
|
Belleplain State Forest in Woodbine, New Jersey is an excellent place
for astrophotography. It combines a few unique advantages for those in the New
York City area (as well as areas closer to it). First, it is an
excellent dark sky location from which to do astrophotography. It is
also a public location that is open to everyone and has fairly easy /
simple access on almost every night of the year (call ahead to double
check for a specific evening). The author is not aware of any place
closer to New York City that combines all the advantages that Belleplain
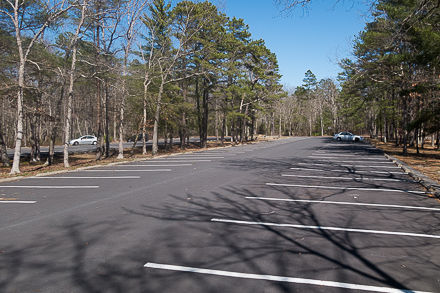
does. Belleplain is located in southern New Jersey about 155 miles from New York City. Its "Athletic Field" is popular among star gazers (although it was 100% empty on at least one twenty-degree winter weather weeknight when the author was there in early April). In order to be in Belleplain after dark one needs to obtain a camping permit ($25 per night plus a $5 fee if getting the permit as a same day walk-in from the on-site office). There is a heated / winterized bathroom (with showers) available in a nearby camping area. One can drive in and out of Belleplain during any hour of the night as no gates are locked overnight in the park. It also possible to sleep in one's vehicle as long as you have a camping permit. There is a large parking lot just north of Lake Nummy which is located about 75 feet south of the Athletic Field. Please consult this list of very highly recommended online resources to learn much more about Belleplain State Forest. Places of interest near Belleplain State Forest include a library with free WiFi that is open until 9:00pm most nights and Cape May. |
 |
 |
|
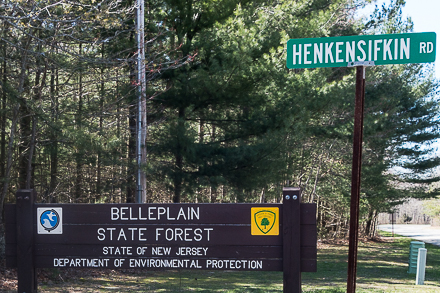
| Entrance to Belleplain State Forest. (April 2016) | The main office at the entrance to Belleplain. This is where camping permits are sold. (April 2016) | |
 |
 |
|
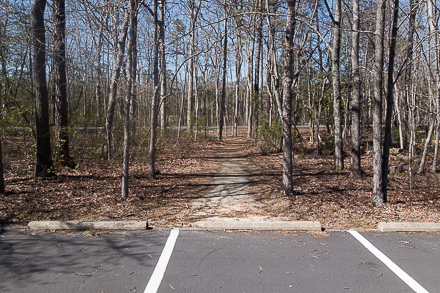
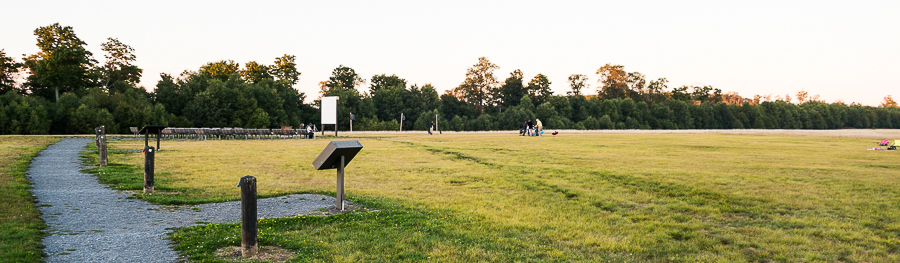
| The parking lot just north of Lake Nummy. (April 2016) | The path (center) from the parking lot to the Athletic Field. (April 2016) | |
 |
||
| The Athletic Field (April 2016) | ||
 |
||
| Lake Nummy (April 2016) | ||
| Cherry Springs State Park |
|
Cherry Springs State Park located near Sweden Valley and Coudersport, PA
is an excellent place for astrophotography and in fact has a designated
"Astronomy Observation Field". It is considered by some to be
the best place for stargazing on the east coast (which is not an
assertion that I would challenge). Cherry Springs is located in Pennsylvania about 267 miles from New York City and is open every day year-round. Please consult this list of very highly recommended online resources to learn much more about Cherry Springs. |
 |
 |
|
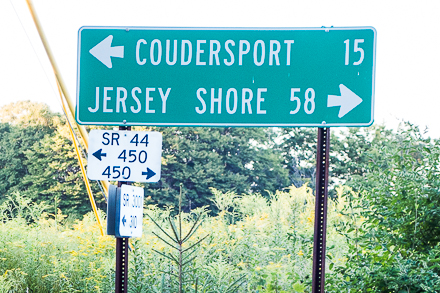
| Cherry Springs State Park is located along Route 44 and is about 15 miles south of Coudersport. (August 2016) | ||
 |
 |
|
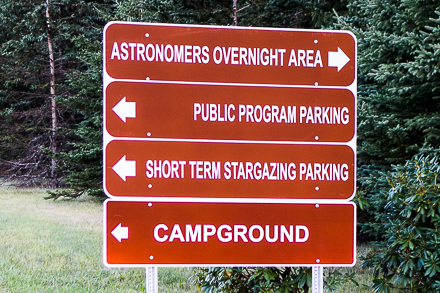
| Unless you have a reservation then the "Short Term Stargazing Parking" area is where you should park. (August 2016) | Luxury accommodations in parking area. (August 2016) | |
 |
 |
|
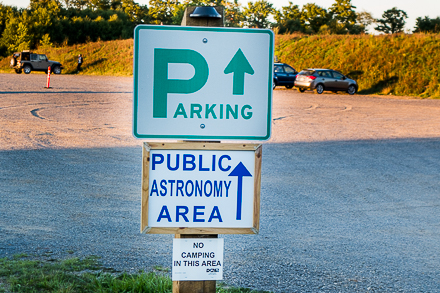
| A large parking area is provided. (August 2016) | Sign showing the short path from the public parking area to the "Public Astronomy Area". (August 2016) | |
 |
||
 |
||
 |
||
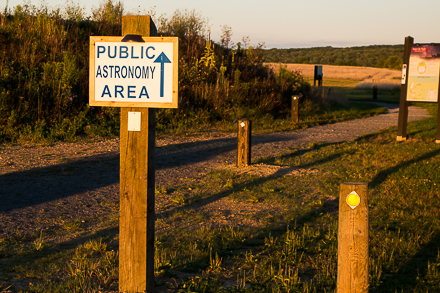
| The public astronomy area is huge! (August 2016) | ||
 |
 |
|
| Above image captured at Cherry Springs State Park showing (left) a before (only a lens profile was applied in Lightroom) and after (right) post processing (in Lightroom) version of the same image. To the naked eye the actual scene was somewhere in between the two images as a human eye can perceive more than a camera's image sensor will produce in a RAW image straight out of the camera. Technical Information: Nikon D800, Nikon 14-24/2.8 lens set at 14mm and f/2.8, 20 seconds, ISO 1600. (August 2016) | ||
| Online Resources: |
| General Resources |
| ClearDarkSky - "forecasts of astronomical observing conditions for over 1900 observatories and observing sites in North America." Sort of like a weather report for astronomers. |
| Moon Phase Calendar - A calendar of the phases of the moon. |
| Observing Sites - Places to view the night sky around the United States and Canada. |
| Stellarium - "Stellarium is a free open source planetarium (software) for your computer. It shows a realistic sky in 3D, just like what you see with the naked eye, binoculars or a telescope." It helps you plan your outing to do astro photography. I prefer the PC version over the smartphone versions. Very highly recommended! |
| Belleplain State Forest Resources |
| Belleplain State Forest website - The official State of New Jersey Department of Environmental Protection website for Belleplain. |
| Observing Site's Belleplain State Forest entry - A general discussion of viewing the night sky at Belleplain. |
| Belleplain State Forest Clear Sky Chart - A forecast of viewing conditions at Belleplain. |
| South Jersey Astronomy Club |
| Cherry Springs State Park Resources |
| Cherry Springs State Park website - The official Pennsylvania Department of Conservation and Natural Resources website for Cherry Springs. |
| Observing Site's Cherry Springs State Park entry - A general discussion of viewing the night sky at Cherry Springs. |
| Cherry Springs State Park Clear Sky Chart - A forecast of viewing conditions at Cherry Springs. |
| Frosty Hollow Bed & Breakfast - Is located near the park and is where the author has stayed (and can recommend based upon his own experience). |
| Astrophotography Educational Resources |
| Dave Morrow Photography - lots of free and some paid resources. |
| Lonely Speck - lots of free resources. |
| Feedback / Questions: Please feel free to email Michael Brochstein with any comments, suggestions and/or questions. |
| Full Disclosure: This is to let you know that the author has no financial interest in any of the items, vendors or websites mentioned on this page. |
Last update: 9/3/16