Video Conferencing:
Improving Your Home Set Up
|
|
Video Conferencing: |
| For Users of Zoom, Skype, Cisco Webex, Google Hangouts, Google Meet, GoTo Meeting, Facebook Messenger Rooms, Microsoft Teams... | |
| Copyright 2020 by Michael Brochstein | |
 |
 |
| High Quality & Simple or No Holds Barred Top Quality? It's all here in this guide. | |
| Introduction: |
| It literally took a world-wide pandemic to greatly increase
the number of people who videoconference from home. In almost no
time the majority of the world went from in-person schooling,
work, and other activities to doing these online. This is a guide
for how to improve your videoconference setup at home. The goal of this article is to show you how to have high quality images and sound from your home videoconference setup. It will show you what to look for when you purchase webcams, microphones and other relevant equipment and will also give suggestions about using this equipment. I will suggest specific products in each category and will provide links to where these can be purchased (the author gets no kickbacks from these links). All the specific products (i.e. webcams and microphones) mentioned have been researched and are recommended by the author. Products with an * asterisk before their name have also been personally tested by the author. |
| Media Professionals: |
| If you are a media professional who is broadcasting from home then all the longer discussions below are relevant to you including the sections on No Holds Barred Best Home Based Video and Gotcha! Audio / Video Synchronization Issues section. |
| Webcams: (a.k.a. cameras) |
| Webcam Advice / Short Version - Buy a webcam that has
1080 resolution and a tripod mount. For specific buying
advice skip the long discussion below of webcams and go to the
listing further down of
recommended webcam models or to the
discussion of microphones, lighting, and other issues.
Recommended webcams can be found here. Webcam Advice / Long Version - Look for a webcam with "1080" resolution and a tripod mount. A 1080 webcam creates images with a resolution of 1,920 x 1,080 pixels. This is also referred to as Full High Definition ("FHD"). Lower resolution (and usually less expensive) webcams usually can only create a 720 image with 1,280 x 720 pixels. Images with more pixels are sharper and show details better than ones with fewer pixels so an image from a 1080 webcam is generally superior to one from a 720 webcam. Common flat panel TV's are FHD (1080) although some higher end models have more pixels (i.e. 4K and 8K TV's). Most TV channels broadcast in the 1080 format. For comparison, a 1080 webcam creates images with a much smaller number of pixels compared with those created from a typical digital still image camera. A 1080 webcam creates an image that has about two million pixels in it (1,920 x 1,080). Worse, a 720 webcam produces an image with less than half that (1,280 x 720). A 24 megapixel digital still camera produces a 24 million pixel image (6000 x 4000), about twelve times as many pixels as those in an image created by a 1080 webcam. Another advantage of still image cameras is that their image sensors may be larger and therefore create superior images because of their larger size - a discussion of image sensor size is beyond the scope of this article. One might ask why there are no webcams with a higher resolution than a 1080 webcam (1,920 x 1,080). The simple answer is that most video communications systems (Zoom, Skype etc) can not handle a higher resolution. - Use the Windows 10 "Camera" application to easily switch between cameras to compare them (i.e. a laptop's built-in webcam versus an external webcam). Maximize the size of the Camera application window size to make it easier to evaluate a webcam's image. This is also an easy way to focus cameras that are manually focused. - See below for specific webcam buying recommendations and for suggestions regarding webcam placement (further below) in your home setup. |
 |
 |
| 1080 webcam | 720 webcam |
 |
 |
| 1080 webcam | Small section of 1080 webcam image to the left. |
 |
 |
| 720 webcam | Small section of 720 webcam image to the left - not as sharp as a 1080 webcam. |
| For comparison, below are similar images from a 24 megapixel digital camera. | |
 |
 |
| The above scene (left) shows a page of text in a much smaller part of the image than that used for the 1080/720 examples above (above, left). The text itself is also smaller than that used for the 1080/720 examples above. An equivalent small section of a 1080/720 image would be unreadable. | |
| It can be very "interesting" to compare a laptop's built-in webcam to an external one. Below is an example from a current model high-end laptop's 720 webcam (left) and an external 1080 webcam (right). The set-up is otherwise identical between the two images. I think it is obvious which one is better. | |
 |
 |
| High-end laptop's built-in 720 webcam | 1080 image from an Unzano 1080 webcam (sharper and better focused. Admittedly the lighting should have been more even but that is the author's fault, not the webcam's. |
|
Webcam Placement - Try
to get the webcam / camera's height near eye level or slightly lower.
For a laptop's webcam do this by putting the laptop on top of a stack of
books. If using an external webcam then mount it on top of a monitor or
on a tabletop tripod (below) just behind a laptop. Distorted / enlarged nose? Another factor to be aware is the distance between the webcam and you. If your nose looks larger proportionally than it does in real life then the likely culprit is that the distance between you and your webcam is too small. Similar to taking selfie's with a phone, the closer your camera is to your face, the more distorted it will be. The further back from the webcam you are, the less any distortion will be. |
|
 |
 |
 |
||
| "NoseCam" | Eye level | Too high | ||
 |
 |
|||
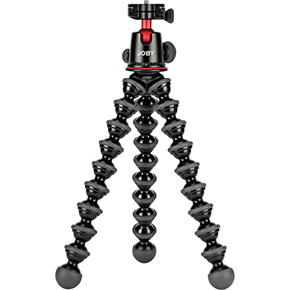
| * JOBY GorillaPod 3K Flexible Mini-Tripod with Ball Head $56. Large enough for most situations. | *
JOBY GorillaPod 5K Flexible Mini-Tripod with Ball Head
$100, If you need something taller. |
|||
| Webcam
Buying Recommendations: - Recommendations below are all for 1080 webcams and relate to a webcam's image quality, not their microphones / sound quality. - "Field of View" refers to how wide an angle the lens is. If you have a multiple of people wishing to be seen by the camera at once then a wider (larger) field of view might be is preferable. - Some webcams have to be focused manually and others automatically focus themselves. The advantage of a manually focused webcam is that you control exactly what the webcam is focused on. In most cases this works out well as the distance from a webcam to its subjects (you?) does not change much so a webcam may only need to be focused once when initially setup. An autofocusing webcam focuses automatically which is both good and bad. Good when it does it well and bad when it does not. Autofocusing webcams usually do not allow you to override their focusing decisions so you are stuck if they are not what you want. |
 |
 |
 |
||
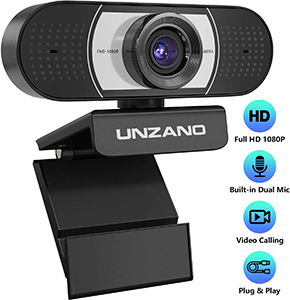
| * Logitech C920s HD Pro Webcam $70. A very popular and well regarded model and one I highly recommend - its camera and microphone are both very good. 78 degree diagonal field of view. | Microsoft LifeCam Studio $80. 75 degree diagonal field of view. | * Unzano HD Webcam 1080p $34. Manual focus. Field of view not stated but I'm guessing ~ 90+ degree diagonal field of view. |
|
Webcam Limitations / Rant! - I can't help it. My day
job is photography and I spend some of that time in professional TV
studios. While this article is about improving a typical home based
video conferencing setup, I can't help but see the difference between using a webcam at home and the images that come out of TV
studios. This section describes why that is. The section (below) called
No Holds Barred Best Home Based Video Quality tells you how to get
results at home that might rival a TV studio's. The biggest difference in video quality between a typical home videoconferencing set-up and a TV studio is cost. The saying "you get what you pay for" applies. Most webcams cost well under $100. All professional video cameras cost a lot more. For that extra cost you do get something. Let's start by discussing what you don't get in a typical webcam. Photographic lenses have adjustable apertures. An adjustable aperture lets vary the amount of light entering the camera through the lens. In a dark place you may open the aperture as wide as possible so as to let as much light reach the image sensor as possible. In a very bright (beach) setting you would generally do the opposite. Consumer webcams don't have adjustable apertures. Some webcams have software that allows you to adjust the brightness but this after-the-fact adjustment doesn't usually work when using Zoom or Skype and is of little practical use. Why is an adjustable aperture important? First we have to discuss dynamic range. A human eye can see what's in a dark shadow and on a bright beach. They have what is referred to as a wide dynamic range. Image sensors have a more limited dynamic range. Dynamic range refers to the range of light from dark to bright that an image sensor can see without a very bright area of a scene becoming pure white because it is beyond the limit of the sensor and dark areas becoming pure black because it is too dark an area for a sensor to sense. Since an image sensor has a limited dynamic range we want to make the most of it. Cameras do this by using an adjustable aperture. In a dark room we might want the aperture to be wide open as the entire scene is dark and in a bright place we might want to close down the aperture to let less light in as the scene may be too bright for the sensor. By making the aperture smaller we shift what might be too-bright scenes to where the sensor is able to work best and by opening it up we allow all the light of a dark scene to get to the image sensor. Since webcams don't have an adjustable aperture the scenes they work best in must be not too dark or too light. Examples in the Lighting section below show when the light is too bright or too dark. Another factor that negatively affects webcams is that their image sensors are very small, similar in size to cellphone camera's image sensor. A larger image sensor can "see" better in the dark because it has a larger area to gather light (photons) for each pixel - a bigger "net" for light. A larger sensor will also have a larger dynamic range and have less noise in images (noise is like grain in film cameras and may look like random small particles of dirt in an image - as in a high ISO image from a still camera). In technical terms, a larger sensor will have a better "signal to noise ratio" - the signal is the image you want and noise is not what you want. Unfortunately, larger sensors cost more than smaller sensors in a non-linear way - a sensor that is twice as large as another sensor will cost more than twice the price. Larger sensors also need larger (and more expensive) lenses as the image sensor is larger and the image created by a lens then therefore also needs to be larger. Another area where a webcam does not give a user control is over color / "white balance". Webcams decide for you if the light is warm (orange) or cool (blue) or something else. Sometimes they get it right and sometimes they don't and you may not have any control other than to try different lighting and/or clothing. Lights, including the sun, have different colors. For example, a sunset has a warmer color than the sun at noon. Indoor lights such as incandescent, fluorescent, warm LED and cool LED lights all have different white balances. A human eye has no trouble adjusting so that everything looks normal but an image sensor can't and cameras in general guess at this (i.e. using an "auto" white balance setting). If all your clothes are blue and the paint on the walls is blue then your webcam may not realize this and may try to adjust incorrectly. Webcam costs are held to a minimum to keep their cost friendly to consumers. Lenses and other components of a webcam may be just good enough (which may be arbitrary) but no better. In the pursuit of a better home video conferencing setup the author tested various webcams and was not generally happy. He got lucky in that one value oriented manually focused model generated reasonably sharp images. A very popular manufacturer's autofocusing model did not ever seem sharp and another no-name manually focusing model was okay at best (to be very generous). |
|
No Holds Barred Best
Home Based Video - To get the best quality image in
your home video conferencing set-up you will need to use a camera that
is more capable than a webcam. You will need to use a camera with a lens
that has a controllable / adjustable aperture, a larger image sensor, and much more
control over how the camera and lens operate. When the author first tried to use a full frame mirrorless still camera as a webcam he knew the image quality would be better. What he wasn't fully expecting was just how much better it would be. At 1080 and 720 resolution, there was a dramatic improvement in image quality over the four webcams that the author tested against. You may already own much of the equipment necessary if you already own any advanced digital camera such as an interchangeable lens DSLR, mirrorless camera, video camera or a fixed lens advanced still or video camera. These cameras typically have larger sensors, higher quality lenses (with adjustable apertures!) and much more control over their operation than a webcam has. There are generally two ways to connect a digital still / video camera to a computer so that the computer thinks your camera is just another generic webcam. The details can vary according to which model camera today you have. In general connecting a digital camera to a computer is done via a USB or a HDMI cable. Connections via HDMI are considered to deliver better image quality but USB connections will also result in images that are much better than a webcam's. One way of connecting a camera to a computer is through a software application on a computer. This software helps a computer utilize a camera's USB connection and makes the camera look to the computer like a typical webcam. Various camera manufacturers (i.e. Canon, Nikon, Sony, and Fuji) offer free software to do this and there are also third-party software options (i.e. Sparkocam) . Another way is to use a "video capture" device (i.e. Avermedia BU110). This is a small physical device which, in general, connects to a camera with a HDMI cable and to a computer with a USB cable. A video capture device makes the camera look like a generic webcam to a computer. Video capture devices such as the Avermedia BU110 mentioned are "plug-and-play". They might not require an AC adapter or have any switches or other controls. All you generally have to do is connect one cable to your camera and another to your computer, that's it. Unfortunately, the use of a video capture device can introduce a video / audio synchronization problem if the image is from your camera and your sound (microphone) is not. This is discussed below. By using an advanced digital still / video camera you can fully control exposure, focus and white balance. You will also get a much higher quality image because of an advanced digital camera's larger image sensor and because of the superior lens that an advanced digital camera has compared with a webcam's. One disadvantage of using an advanced digital camera is that the camera is not powered from the computer via a USB cable (a webcam is). For longer video conferences using an AC adapter for your camera might be required as a camera's battery may only allow 30+ minutes of use before it is depleted. Bottom Line Top Quality Video Set-Up - Use a full frame mirrorless camera (with an AC adapter) with a 16-35mm, 24-70mm or similar lens connected to a video capture device. Most of your setup work will be setting your camera's various controls. In many cases the controls will only have to be set up once and the ON / OFF switch is all you will need to touch when video conferencing. Connect your camera to a computer with a good amount of power and use a fast internet connection. Using a lower powered computer or slower internet connection can compromise any efforts you've made to improve your home video conferencing setup. Beware of audio / video synchronization issue if you do connect a microphone directly to a computer bypassing the camera (see below for details). Gotcha! Audio / Video Synchronization Issues - The use of a video capture device entails some processing by the video capture device of the signal from the camera to the computer. If you use both the sound and video from a camera then there is not likely to be any issue. If instead you plug a microphone directly into a computer (or USB hub) and the camera is plugged into a video capture device (which then connects to a computer via USB) then the video may lag the audio by a noticeable amount. One way to test this is to clap your hands on screen. If the sound from the clap comes when your hands meet then there is not likely a synchronization issue. If you hear the clap before your hands meet on screen then you have an audio / video synchronization issue where the video is lagging (delayed) behind the audio. In this case you will need to route the audio (microphone) through the camera so that the audio and video signals are synchronized. A camera's built-in microphone is usually not the best option for optimal audio. The use of an external microphone is highly recommended. A pre-amp / mic mixer / audio adapter connected to a camera's mic input jack can also be used to gather the sound from high quality microphones. A caveat; There is livestreaming software (i.e. OBS - Open Broadcaster Software) which can allow one to adjust an audio or video feed so that they synchronize in cases where they don't otherwise. If you are a media professional livestreaming or broadcasting from home then livestreaming software may help with audio/video synchronization. Additionally, video editing software can also do this but is aimed at editing recorded audio and video, not live broadcasting / video-conferencing. The use of livestreaming and video editing software is beyond the scope of this guide. Below is an example of an audio / video sync issue. In the video on the left, there is no issue. The video on the right has an audio / video sync issue were the video is behind / trails the audio. Click on the images below to play each video. |
| No video / Audio sync issues. | The video trails the audio, the sound of the clap comes before the image of the actual clap. |
| Microphones: |
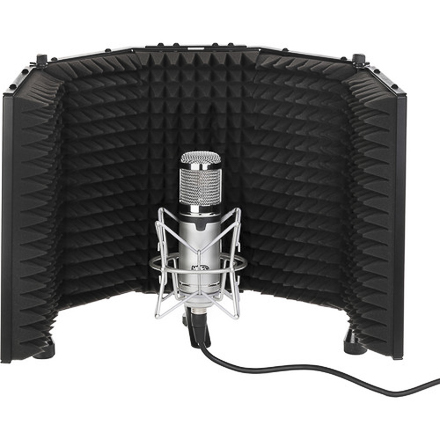
| - Webcam and laptop microphones can be disappointing. - Use the "Test Mic" feature of Zoom (in "Settings" under "Audio") to easily test and compare laptop, external webcam, headset and other microphone options. This is a great way for you to hear how you sound as you will get to record a short audio recording and then immediately hear it played it back to you. Another option is to use the Windows Voice Recorder application. - Try to video conference from a quiet location. - A good quality headset can be an excellent value relative to purchasing a microphone. When using a headset one does not need to consider which way their head is facing as a headset's microphone is always in the same place relative to one's mouth. Speakers are not needed as a headset has them built-in. A headset is also preferable over a regular microphone and speakers when videoconferencing in a noisy environment. - If you are videoconferencing from a place with some echo or the walls and other surfaces (floors, ceilings, tables) have hard finishes (no acoustic tile, carpeting etc) then there could be some subtle echo / resonance when you videoconference from that area. While you could construct a sound studio lined with sound deadening material, another option is to use a microphone isolation shield (image below). Isolation shields come in a range of sizes and shapes and range in price. Below are audio clips demonstrating the effect of using an isolation shield. Please note that the effects of using an isolation shield can be subtle - it depends on the specifics of where you are videoconferencing from. |
| With NO isolation shield being used. | With an isolation shield being used. |
| Below are audio samples from various microphones. When evaluating them, please ignore differences in volume levels as microphone gain (volume) is adjustable in various applications (Zoom, Skype...). |
| Audio Technica AT2020 (XLR) | Blue Yeti (USB) | Rode SmartLav+ (Lavalier, 3.5mm plug) |
| Rode VideoMic GO (mounts on top of camera) | Logitech H390 headset (USB) | SaramonicSR-ULM-10 (Lavalier, USB) |
| Nikon Z6 camera built-in microphone | Laptop #1 built-in microphone | Laptop #2 built-in microphone (note that the laptop's fan can be heard) |
| Microphone Buying Recommendations: For connecting to a computer via a USB cable. |
 |
 |
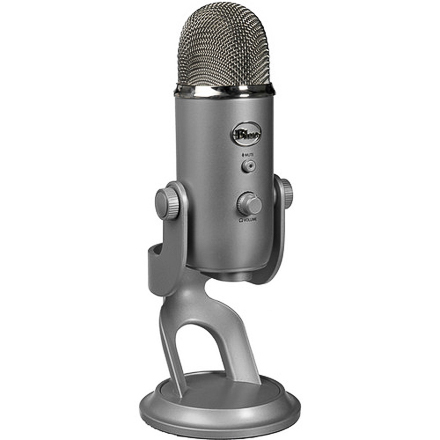
| * Blue Yeti USB Microphone $130. Very versatile. | Rode NT-USB Mini USB Microphone $100 |
 |
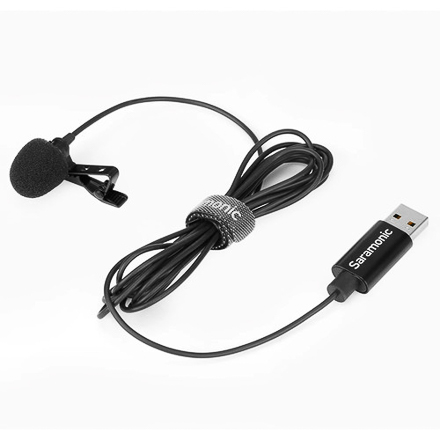 |
| * Logitech USB Headset H390 $40 | * Saramonic SR-ULM10 Omnidirectional USB Lavalier Microphone - $35 |
| Microphone Buying Recommendations: For camera connected microphones. |
| If you have reason to connect your microphone to your camera and not
to a computer via a USB cable then this section is for you. There are a few reasons to connect a microphone to a camera and not to a computer. One is to solve an audio / video synchronization problem (see Gotcha! Audio / Video Synchronization Issues above). Another is use various professional (i.e. with XLR connections) audio equipment. Lastly, it may simply be practical in your set-up to do this. Please note that there are less expensive options than those listed below. |
 |
 |
|
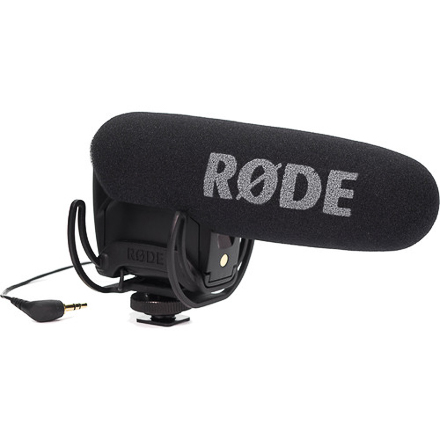
| Rode VideoMic Pro Camera-Mount Shotgun Microphone $229. For mounting on top of a camera. | * Audio-Technica AT2020 Cardioid Condenser Microphone $99. Does not include XLR cable, stand or shock mount. | |
 |
 |
|
| Sennheiser EW 112P G4 Camera-Mount Wireless Omni Lavalier Microphone System $599. | * Beachtek DXA-MICRO-PRO PLUS Active Audio Adapter $229. Used to connect XLR microphones to a camera. | |
| Other Options: | ||
 |
 |
|
| Microphone Isolation Shield | * Rode smartLav+ Lavalier Condenser Microphone $94 with SC3 3.5mm TRRS to TRS Adapter | |
| Lighting: |
| Lighting Advice /
Short Version: - Avoid backlighting; Light the front of your face, it should be brighter than the background. - Avoid dark places; Brighter locations will generally result in better image quality. Unfortunately, consumer typical webcams do not have a wide latitude for how dark or bright a scene they can properly handle. A too-bright scene will lead to overexposure where highlights will be "blown out" and be totally white with no details. Likewise, a too dark setting will also not look optimal. |
 |
|
| Backlit | Not backlit (and not too light or dark) |
 |
 |
| Overexposed - too bright | Underexposed - too dark |
|
Lighting / Long Version: Do you want to accentuate wrinkles on your face or minimize them? Do you want light to be warm, cool or neutral in color? Do you want the light be dramatic or not noticed? These are decisions that can determine how you look. A full discussion of lighting is beyond the scope of this article. There are *many* books, videos and other materials that discuss photographic / video lighting. In this article I will only discuss the basics. Major TV network news shows and press briefings broadcast from TV studios generally have a similar look. The lighting is even all around (no obvious wrinkles) and the color is accurate / neutral. There will usually be an array of lights (i.e. LED light panels) spread all around the front (and possibly sides) of the speaker and aimed at the speaker. Lights will generally be aimed down at about a 20 - 30 degree angle so that the speaker is not directly starring into them (and to avoid reflections in most eyeglasses). At a minimum most TV news set-ups have two lights set up 45 degrees offset left and right and at about a 30 degree angle upward from the speaker. At home you may not have the room or budget to set up a full size TV studio so this article will discuss home-friendly lighting ideas to accomplish the same end result as best as possible. Experimentation is key. Trying different set ups so that you find one that fits your space and budget is recommended. Bouncing lights off walls will spread out the light and soften it and experimenting with where they are aimed will probably be necessary. LED light panels vary widely in cost. Basic and fully controllable (full white balance and brightness control + barn doors) cost about $100. Each light will need a light stand (short ones for a desktop and taller ones for use on the floor). A basic home set-up will generally not need more than two lights. Adjust (dim?) your lights so that there are no hot spots / blown-out highlights / areas that are pure white on your face. Use lights that have the same color so that your hair does not look yellow / orange as it might if an overhead light is a warm LED and your cheeks look blue if the light from the side is from a window which is cooler. |
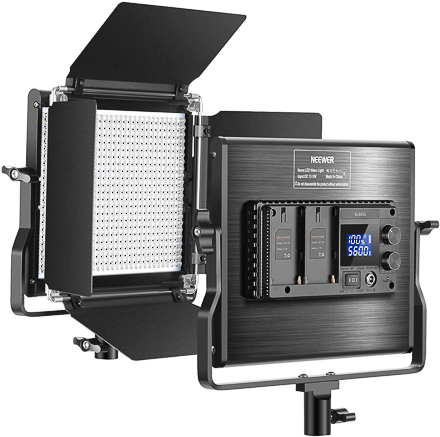 |
| * Neewer LED light panel $96 |
| Computers / Internet Connection: Other factors to consider are the computer the webcam is connected to and how fast your internet connection is. An old or slower computer may have trouble handling the image processing and communications necessary. A slow internet connection can diminish image quality as videoconferencing software may require a faster connection for optimal video quality. Anything invested in better cameras, sound or lighting may be wasted if you are using an inadequate computer or a slower internet connection. |
|
Backgrounds / Virtual
Backgrounds /
Green Screens / Chroma Key - We've all seen it by
now, TV news correspondents reporting from home with a bookcase or a
room at home in the background. Some commentators have even noted which
books seem to be commonly seen in these bookcases (i.e.
Power Broker by Robert Caro). Some of these backgrounds are real and
some are not. Zoom allows one to substitute a photo of your choice for the background. This is called a virtual background. With it you can have the beach, a city, bookcase or any image as your background. It takes a bit of computing power to do this and those with older or slower computers have discovered that Zoom doesn't allow this option unless their computer meets minimum requirements. You might ask why so much computing power is needed. The Zoom software is trying to figure out which in the scene is you and which is not you. It needs to know this so as to know where to show the virtual background and where to show you. One of the hardest places to figure this out is with one's hair. For each strand that might stick out it needs to calculate which is a strand of hair and which is the background. Once it knows this then it can substitute a virtual background for where you (and your hair) are not. To make it a much more difficult problem, Zoom needs to calculate this with a moving target (you) in real time. As you may have noticed in Zoom sessions, the border between you and a virtual background is probably not perfectly drawn. It may be close but it is generally not at perfect. A less accurate border may show your outline smoothed as opposed to showing what may be the more ragged detail of the real outline of you and especially your hair. To make it easier for for Zoom to figure out what is you and what is the background, a green screen / chroma key background is used to make it easier for the software to figure out what is the background and what is you. A green screen works because it is noticeably different enough in color from the colors that people's skin and clothing usually are. If you are using a green screen then there is a place in Zoom's settings to tell it that you are using one. Doing this will generally result in more accurate results so that the final image will have more details of your outline and not show it as smoothed out. Green screens / chroma key backgrounds are typically green (and sometimes blue) and are readily available in various sizes and configurations. If you use one then it needs to be at least moderately bright so that the software can easily detect it - and you may have to add lights that shine on it to achieve this. Another alternative is to use a background that is real. What you use depends on your goals and what you want the world to see when they look at you in a video conference. Common real backgrounds include bookcases, rooms in one's house, drapery and blank walls. |
 |
 |
||
| The green screen is leaning against a light stand. An Angler Chromakey Collapsible (5 x 7', Chroma Green) green screen is shown above. | |||
 |
 |
||
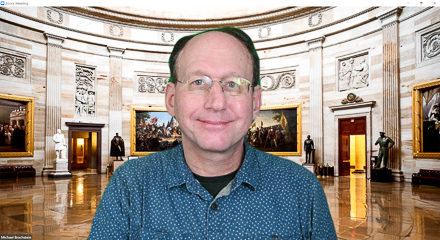
| Zoom session with a virtual background (U.S. Capitol Rotunda) and a green screen but with the Zoom check box for a green screen not checked. | Detail from the image at left. Note the leakage of the green screen into the image around the periphery of my head as well as the smoothing / rounding off of my hair's outline (compare to the image below), | ||
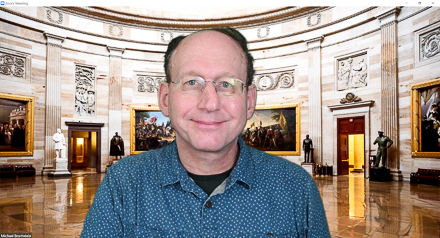 |
 |
||
| Zoom session with a virtual background (U.S. Capitol Rotunda) and a green screen and with the Zoom check box for a green screen checked. | Detail from the image at left. Note that my hair's outline is not smoothed and is more accurate and that there is no leakage of the green screen into the image - much better than the image above. | ||
 |
 |
||
| Zoom session with a grey 5'x7' pop-up background, not a virtual background. | Detail from the image at left. Note the accurate outline of my hair. IMO, superior to a virtual background as no manipulation of the image is taking place. | ||
| Putting it All Together | |
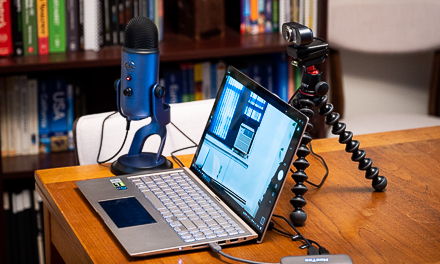
| The Simple High Quality Setup - You don't need to spend a lot or be an audio or video engineer to get good quality video and audio. In terms of equipment all you need is a good quality webcam, microphone, and table-top tripod. Lighting can be free with careful use of existing light sources. Finally, a decently powerful computer and good internet connection is necessary. The total cost (not including the laptop, USB hub or internet connection) is about $200 (based on the setup in the image below). | |
 |
|
| Simple But High Quality - A webcam (Unzano HD Webcam 1080p) on top of a tabletop tripod (Gorillapod 3K) and an external microphone (Blue Yeti) is all the videoconferencing related equipment necessary. | |
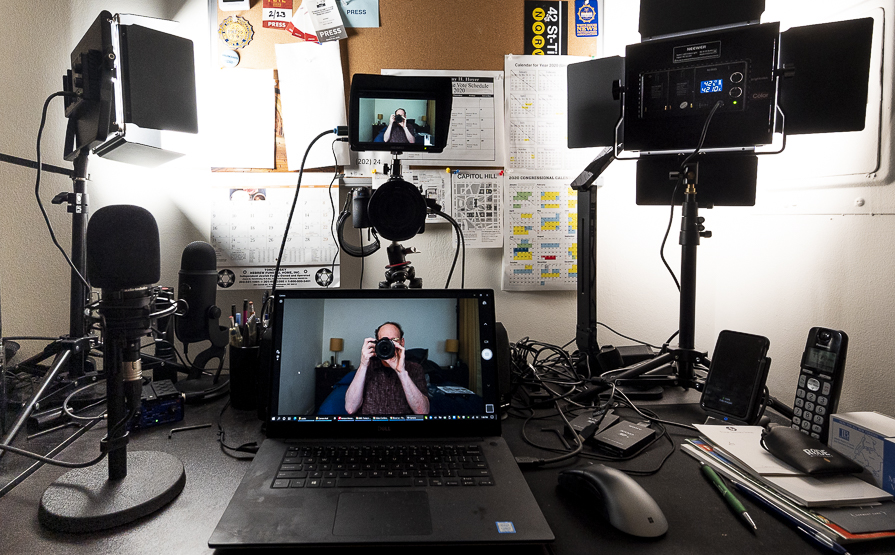
| The No Holds
Barred Top Quality Setup
- The set-up below is not simple or cheap but does yield excellent
quality audio and video. Equipment shown below includes a full frame mirrorless camera (Nikon Z6) and lens (Nikon 24-70/4 Z), a tabletop tripod (Gorillapod 5K), a video monitor (Feelworld T7), a video capture device (Avermedia BU110), an external XLR microphone (Audio Technica AT2020), an audio adapter (Beachtek DXA-MICRO-PRO PLUS), two LED light panels (Neewer 10096140 ). Other equipment used includes a HDMI splitter, microphone shock mount, microphone stand, AC adapter for the camera, headphones (for testing), cables (HDMI, XLR, USB, 3.5mm) and lightstands. Not shown is a microphone isolation shield and a green screen. |
|
 |
|
| No Holds Barred Top Quality Setup - Greater complexity and expense do pay off in a top quality home based videoconferencing setup. | |
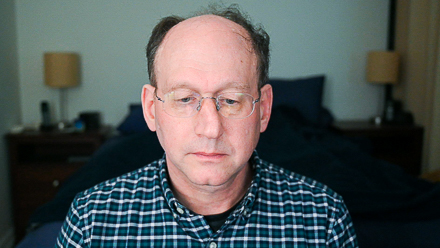
| What's Missing? - Did
you ever see someone on a videoconference who is looking down and not at
the webcam? Most likely this is because their computer screen is lower
than their camera. You can elevate your computer screen and / or
position your webcam directly in the front of your computer screen. An
obvious downside to this strategy is that placing a webcam in front of
your computer screen would block the image on your computer screen.
Placing a webcam just above your computer screen may solve the problem
of blocking the screen but may still be offset too much from the image
on your computer screen to solve the issue of looking as if you are
looking down. One way professionals deal with this is through the use of a teleprompter. Imagine if your webcam was invisible and in the middle of your computer screen. You could then look straight at the other people in a videoconference and at your computer screen at the same time. This is what a teleprompter allows you to do. |
|
 |
 |
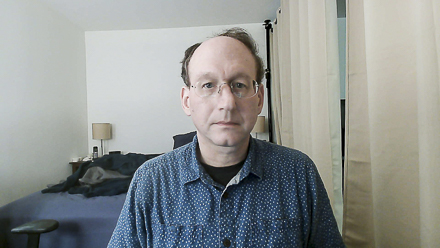
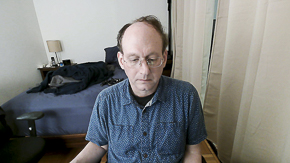
| In the image on the left the camera is above the computer screen and I am looking down at the computer screen. In the image on the right I am looking directly into a teleprompter which shows me the computer screen. The camera, which is directly behind the teleprompter, is invisible to me as I look into the teleprompter. | |
 |
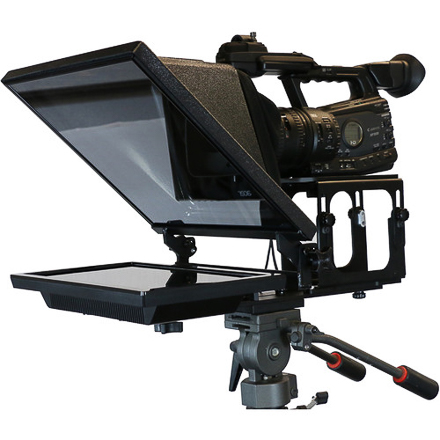 |
| In the left image (above) a computer, tablet, or smartphone screen is on the bottom facing up. That screen is reflected in the top angled mirrored glass so that the user (not shown but would be on the left) can see it looking straight at that top mirrored glass. The "trick" shown in the right image (above) is that behind the mirrored glass is a camera that can see through the mirrored glass. The camera is a normal camera, it is the special mirrored glass that can let the camera see through it.. The user sees just the screen and not the camera. This allows the user to look straight at the camera and see what is on the computer screen at the same time. | |
Last update: 5/30/2021